https://www.soundandvision.com/content/sonos-trueplay-bear-facts#lWvcWelcrO2hWMY5.97
Sonos Trueplay Speaker Tuning: The Bear Facts

What’s Trueplay? One way of explaining Trueplay is to say that it’s a room acoustics correction technology. (See my original report.) But that’s not exactly what Trueplay is. Lots of companies have room acoustics correction processing, including Audyssey, Yamaha (YPAO), Anthem (ARC) (pdf download)—Anthem’s ARC (including the calibrated microphone), by the way, is built into Paradigm’s new Premium Wireless Series all-in-one systems—and others. In one way or another, all of these processing technologies are designed to minimize the deleterious effects the room’s acoustics might have on the sound of the system. Some also attempt to widen the sweet spot and smooth out the response throughout the room. This is usually accomplished by placing a calibrated microphone in multiple listening positions in the room and running a series of tones or bursts so the processor can determine the proper equalization and timing parameters.
Trueplay’s essential difference lies in its intent, which is to make Sonos PLAY:5s (old and new versions), PLAY:3s, and PLAY:1s, sound as much as possible like each model is supposed to sound—regardless of room placement—and that’s a “Regardless” with a capital “R”. In fact, it’s a “REGARDLESS” in all caps. Whereas Yamaha, Audyssey, and Anthem aren’t expecting users to be hiding their speakers behind kitchen cabinet doors, stuffing them between the microwave and the coffee maker, or stashing them behind a TV, Sonos is expecting that. Sonos also anticipates that their speaker system owners probably won’t spend the time placing a microphone in one part of the room and running test tones before moving on to another room position and repeating the process (and potentially repeating and repeating). With most streaming audio consumers, convenience always trumps acoustics.
As a result, Sonos designed the Trueplay calibration process to be as quick and as painless as possible. If you’re able to get it right the first time—sometimes extraneous noises from outside the room can affect the process and require a do-over and sometimes the app isn’t satisfied with the way you’re moving the iPhone up and down—Trueplay can be completed in as little as three minutes.
Three flippin’ minutes! You can’t even do something as simple as make a Soft-Boiled Egg or run a mile in three minutes. (Hell, I can’t even do nothing in three minutes…) In this case, after placing your Sonos speaker where you want it to reside, all you do is navigate to “Trueplay Tuning” in the Sonos app on your iOS device to begin the process.

No, I didn’t forget to mention Android. Trueplay tuning can only be done if the processor knows the calibration profile of the microphone in the handheld device. Sonos says Apple’s microphones are very consistent across the company’s product line, whereas there’s a significant amount of variation in the response curve of the microphones in the multitude of Android devices in people’s hands. (The Sonos folks told me that even identical handsets from different carriers can have different profiles because of variations in each one’s carrier-customized Android implementation. Sonos says it’s working on a solution.) If you’re an Android owner, however, the good news is that an iOS device is only required for the Trueplay tuning process. If you can cajole a family member or friend who happens to own an iPhone or iPad to spend three minutes with you Trueplay tuning your Sonos system, you’ll be good to go. The finalized Trueplay parameters remain in the speaker, not the device used to do the tuning.
If it’s the first time Trueplay tuning has been done on the iOS device you’re using (begged, borrowed, or stolen), the app will walk (literally) you through the process, including playing a short instructional video prior to beginning the tuning. After that, the Sonos app checks the room for background noise. If the noise floor is low enough, the speaker system will begin emitting a noise that sounds like it might have come from the soundtrack of The Exorcist. The tones happen to drive dogs absolutely bat-shit crazy, so much so that Sonos built dog-bark-recognition capability into the technology. If your dog barks during the tuning process, Sonos will recognize it and ignore it. (You may not be able to ignore it, however.) While the test tones are being played, you need to slowly raise and lower the iOS device as you meander around the room. It looks a bit like what Spock would do with a tricorder on a new planet in Star Trek. To me, it feels more like I’m waving some holy relic around the room (sans incense) in an attempt to banish acoustic evils from the room.
Once completed, the speaker plays a warm, reassuring tone; and, then, that’s it. There’s nothing more to do. If you want, you can turn Trueplay on and off (from either an iOS or Android device) to see if the changes made were beneficial. If you don’t like the changes Trueplay has made—which is doubtful—you can turn it off at any time. The acoustic benefits of that Trueplay tuning session, though, only apply to that location. If you decide to move the speaker somewhere else in the room, you’ll have to redo the tuning.
I’ve been able to try Trueplay tuning on all three Sonos speaker models that are compatible with Trueplay. Oh, by the way, Trueplay is a software update that works on any PLAY Series speaker Sonos has ever sold. In other words, a five-year-old PLAY:5 will benefit from Trueplay exactly the same way a first-generation PLAY:5 purchased last month will. Unlike a lot of companies that might use the new technology as a way to add revenue, Sonos is making this a FREE update, too. In fact, if you currently own a Sonos PLAY Series speaker and you’ve updated to the latest version of the Sonos app, Trueplay is already available to use.
Putting Trueplay to the Test

 As I said, I’ve tried Trueplay on Sonos speakers in a variety of locations with results ranging from “pretty much the same” to “holy shit!” The latter included places such as on the top of a kitchen cabinet, on the floor next to the couch, and even hidden in the Christmas tree. In these cases, the muffled highs became much clearer, the midrange came out of its box, and the bass response tightened up—often dramatically.
But I wanted to really test the limits of Trueplay.
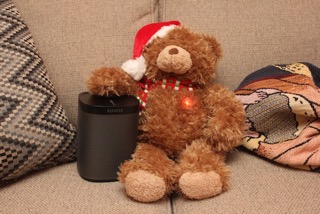
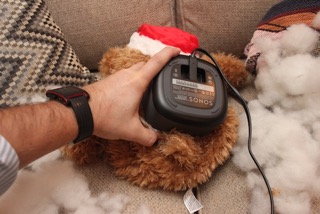
So I shoved a Sonos PLAY:1 up a bear’s butt.
Technically, it was a stuffed bear; and I carefully slipped the PLAY:1 in through a hole in the bear’s back, not up its butt. (It sounds a lot more dramatic the first way I described it, though…) After cutting a hole, I removed enough of the stuffing so that I could insert the PLAY:1 inside without making the bear look like he’d eaten, well, eaten a Sonos PLAY:1. Then I placed the moderately stuffed, “wired for sound” bear in different places around my house—on the couch, on a cabinet, up against the wall on a dresser—and tested out how the PLAY:1 sounded before and after Trueplay tuning.
I have to say that the results were simply stuffing…er, rather…stunning. As you’d expect, prior to Trueplay tuning, the sound coming from the bear’s stomach sounded a lot like a speaker that’s been covered by a pillow: muffled-to-no high frequency output, a honking mid-range, and wildly varying bass response depending on the bear’s location. Almost unbelievably, in each instance, Trueplay tuning was able to make it sound as if I’d set up a totally bear-naked PLAY:1. Actually, it sounded better than that, because without Trueplay, in those locations, the bass and midrange would still have been crappy.
I doubt Sonos will come out anytime soon with a line of stuffed animal covers for its PLAY Series speakers. But, for me, the experiment dramatically illustrated how amazingly powerful Trueplay is. If Trueplay can make a stuffed bear acoustically transparent, what can’t Trueplay do?
Trueplay is more than an awesomely amazing technology. It’s magical—goosebumpingly magical. Of course, you probably believe in the power of technology, not magic. I used to, as well. But the bewitchingly charming acoustic sorcery that is Trueplay has made a believer out of me.


